We've been working on the Jotul 400 wood stove hearth for several days. Since it will be very visible, it is taking a while to get everything just right. The stove manual says that the bottom heat shield allows us to just use a layer of non-combustible material under the stove. But we feel better by making a more heat-resistant hearth.
The subflooring is 7/8 inch Advantech engineered oriented strand board (OSB). On top of that we glued 1/2 inch of Micore 300, a mineral fiber insulating product (R1.1 for the 1/2 inch). The next layer is 1/4 inch Durock fiber cement board, attached to the Micore with Versabond thin-set mortar applied with a 1/4 inch x 1/4 inch grid mortar trowel.
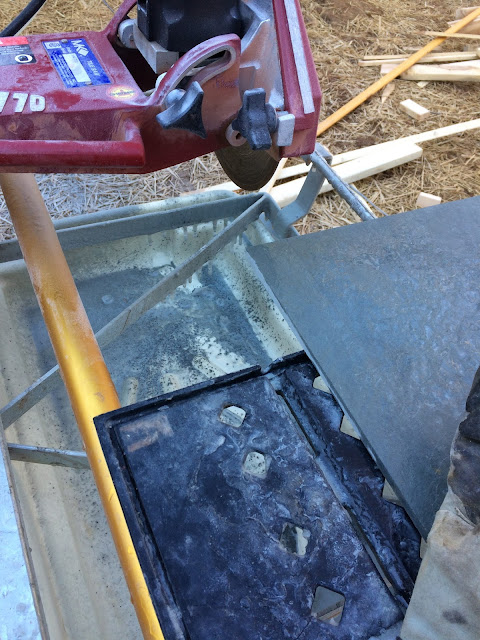
We bought slate tile (real slate, not an engineered product) at Home Depot called Montauk Blue. They have it in several sizes. We needed both 12 inch square and 16 inch square to fit the hearth. We have a wet saw, which makes cutting tile a breeze. Well, today was a bit cooler than a breeze. The water that's used to keep the blade cool and to remove the cut material was freezing on the saw. Ice is dripping from the frame under the blade and the white stuff on the black table is ice. The outside temperature was about 30F, but a little breeze made the saw much colder. On the right side of the table is a piece of slate. The temperature inside is much better at 40-45F.
 |
| Ice is forming on the wet saw |
We decided to use 1/8 inch space between the slate tiles and will be using Pewter gray grout, which closely matches the tile. I managed to get everything cut with only one tile needing to be re-cut. The tiles were cut, starting from the center and working around the edge. The 12 inch tiles are in the center and the cut tiles are positioned around them without any mortar. The dry set allows us to check the look and make adjustments.
 |
| Tile Cut and Dry Assembled with Spacers |
Then the Thin-Set mortar mix was prepared and half the tiles set. The picture below shows the back half of the hearth being set. One row has been set and the second row is about to be set. Note the ribbed texture of the Thin-Set to allow the tiles to settle into the mortar. We used a sponge to mop up the remains of any Thin-Set that appeared on the tile surface.
 |
| Thin-Set applied and one row set |
The whole process took about five hours (I had to fix the wet saw for starters and had to redo one tile). We recorded a time-lapse of the whole process:
Wood Stove Hearth:
The Durock wall behind the stove will be faced in stone, starting next week. The wood stove installation will happen the week after that.
Inside Temperature
We mentioned that the inside temperature is 40-45F. We've been running four oil-filled radiator electric heaters (two at 1500 watts and two at 1000 watts) during the day and they have been bringing the temperature up four or five degrees every day. We've been turning them off at night, so the temperature drops the same amount overnight. Outside temperatures have been around 20F overnight. The house is very tight and retains its temperature very well.
With the mortar set, we left the two 1500 watt heaters and the de-humidifier running (about 10,500 BTU/hr). It will be interesting to check the temperature tomorrow.


Comments
Post a Comment